Download the kf.ltc
I've left out the obvious steps, so if you don't understand how I got from one step to another check out my links page for sites that teach DEdit basics.
Terminology:
Vector: The same coordinate in at least 2 views in DEdit. Either x and y, or x and z, or y and z.
Object: Things like lights, props, doors, and Keyframers and anything that can be modified while in object editing mode (ctrl +H)
Bezier Curve: http://www.moshplant.com/direct-or/bezier/

KeyFramers are one of the most robust objects in DEdit.
Keep in mind:
Using KeyFramers for Multiplayer maps or mods is NOT recommended.
Only use it for Single Player maps. I once had a keyframed elevator in a multiplayer map. The effects where hilarious. The lift would randomly appear or jump around.
Think through your concept.
Decide if a KeyFramer is even necessary for it.
Is it something that can be done using a sliding door?
Is it worth the time and difficulty of adding a Keyframed object?
If you need more than two positions (on and off), consider using a KeyFramer.
****************************************************************************************
Why use a KeyFramer?
You've got a single player map that needs a complex moving object (i.e. a helicopter.)
You've got to add a multilevel elevator.
You need a tank to move along a set path.
You need an effect, like a complex moving object that changes directions and/or speeds.
****************************************************************************************
Things you need for your KeyFramer to work.
1. KeyFramer object
2. Keys
3. Object (WorldModel or other) to Keyframe.
4. Time sweet time, and a shovel load of patience.
Setting it all up:
To begin with decide what you would like to move. In this tutorial, I've created a small platform shaped like an arrow to illustrate the forward vector.
The Keyframer object is actually not bound to anything, however you must place it in the same vector as the start point of the platform. If you don't , your object will start at the keyframer vector anyway. If you have a platform that is triggered by a switch, your object will start in the place where you created it, then when activated, it will jump to the keyframer object vertex.
Also at the starting vector is Key0. Key01 will actually be the first Key that the platform travels to.
If you want to create a loop, like in this tutorial, your ending key (Key09) will also be at the same vector as the Keyframer, and Key0.
So you've got a stack of things all in one spot. The Keyframer, Key0, Key09 (if you have a loop), and the WorldModel of the object you are moving (platform).
Selecting objects that occupy the same vector is a pain. This is why it is important to organize your objects in the nodes panel effectively. I usually do most of my selecting from the nodes pane.
1. Set the path
After creating your KeyFramer, keys and Keyframed object (platform, helicopter etc), go into the nodes view, right click on your KeyFramer object and choose "set path."
When you do this, you get the snazzy red graphic next to your KeyFramer0 in the nodes view.

A line also appears connecting your keys together. This is helpful to show the path of the platform.
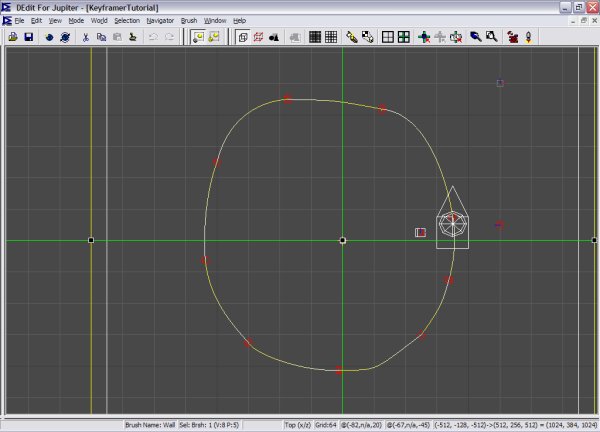
Initially your key path will not have the smooth curves that the above picture has. Your key path will have straight lines going from each key. I will show you how to make the curves in the section titled Bezier curves down below.
2. Set the KeyFramer properties correctly:
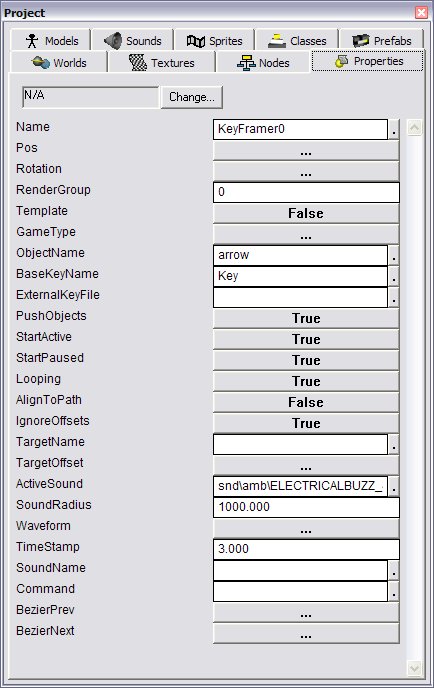
Set the ObjectName as your object ( if I hadn't changed the name of my platform, it would have been the default Worldmodel0 ) my object/platform is named 'arrow' since it is shaped like an arrow.
Set the BaseKeyName to the root name of your keys. Obviously each one of your keys will be named differently beyond the core name, but you must use the same base name. Example Base Name = Key with each key being Key01, Key02 etc.
You could not name your keys: main01, key02, Main3, main_04 etc.
The time stamp on my keys is set to 2 or 3 seconds, you can vary this between keys depending on the distance between the keys.
3. Set up your keys.
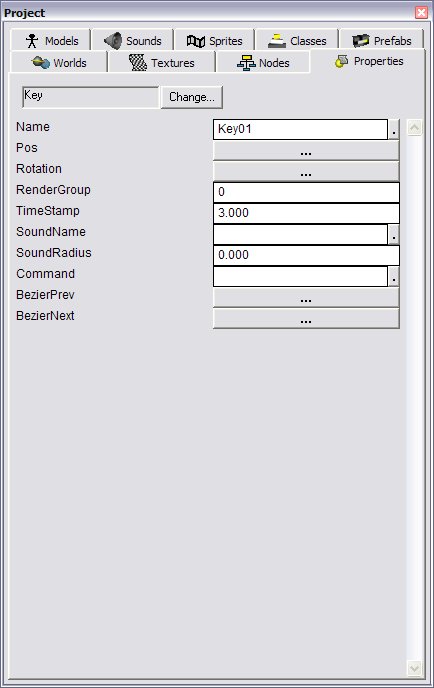
Make sure you change the timestamp of each Key. If you leave the timestamp at 0, your KeyFramer will move faster than the speed of light. So fast, in fact that it will move all the way around the path faster than you can blink!
Ok... it wont move at all.
4. Change your object to IsKeyFramed = True
This is for effects like if a player shoots the platform, then the effects will travel with the platform and not stay midair.
Getting your platform/object to move correctly.
Once you get your object flying around, then you can tweak it. If it's not moving go back and check the properties on everything.
The blue line , when you select the keys, is the forward facing vector.
Align this blue line on the key with the yellow key path by selecting the key and rotate it in the properties.
Make sure you rotate in the right vector. Which view are you lining the forward facing vector up in?
If you missed the following settings for the keyframer0 object from above make sure they are set as:
Looping=true
AlignToPath=false
StartPaused= true (if you want to activate it like in the tutorial)
IgnoreOffsets = true.
This allows the forward facing vector of your object (bound to a brush) to follow the path on its own.
Your platform can be as complex as you want. Just make sure that all brushes that you add are under the object in the nodes view.
Platform settings:
IMPORTANT: In your object properties (The platform worldmodel arrow) Click on the DamageProperties
The Mass Default is 2000.00 You need to change this to 20000.00 in order to support the player weight.
If you don't change this your platform will not change y distance (move up and down), it will only move up if you jump. Instead of pushing the player up.
Thanks to Coty and Il for working this out.
Bezier curves.

Select your key.
Hold P on the keyboard, and hold the left mouse button down.
Two handles appear on each side of the key to make Bezier curves.
Simply drag these to get the desired curve between each key.
If you've used Photoshop, you'll be right at home with creating Bezier curves, as it is similar to the pen tool.
Instead of putting in a million keys, why not make Bezier curves for your object to follow?
The Big Switch:
Do you want the player to control the platform?

Add a SlidingSwitch.
Bind it to only the single control panel brush. This way the player only gets the activate sign on the control panel, and not the whole stand.
Disconnect it from the rest of the geometry by selecting it and pressing control J.
Rejoin the rest (shift J) of the control panel geometry into one brush.
The switch properties:
Its not going to slide anywhere so change the MoveDistance to 0
Click on the command ellipse (...)
send your message to the KeyFramer
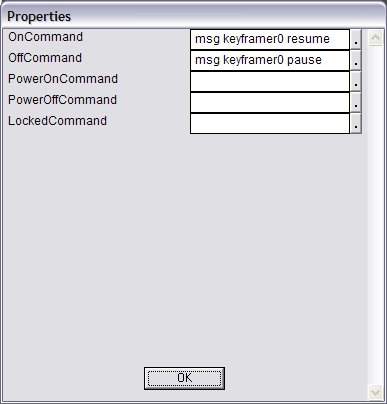
Add the doors
Add a object (such as a doorway) to be triggered by your new KeyFramer keys.
How about a personnel tram like in Half Life?
When the tram enters a tunnel, doors open.
In your door properties:
Move distance 64
Move dir x = 1 or -1 depending on the door.
Opening Time 1.0
Open wait time 0
close wait time 0
under options
TriggerClose and Remain Open = True
Everything else false.
In your key04 properties Command field type:
msg SlidingDoor0 trigger
I used the doorlink feature to have slidingdoor0 open slidingdoor1. (note: the doorlink only works for opening the doors, not for closing)
For the closing in your key05 properties field type:
Msg SlidingDoor0 triggerclose;msg SlidingDoor1 triggerclose
Other sweet things you can do:
Add an object for your KeyFramer to point to:
If you want to have another object that the KeyFramer points to, simply bind a WorldModel to a brush and name it, then in your KeyFramer properties put that name in the field of TargetName. Your platform will face this object through out the trajectory of your key path.
Add an object like a light or a scale sprite.
Add a ScaleSprite directly below the 'engine' of our platform.
Make sure you choose a skin in the sprite properties. It must end with .SPR to work.
Adjust the DIMS, and size of the sprite.
Name the scale sprite "ss" for scale sprite, then in your arrow properties for Attachments add "ss"
The sprite will now fly around with the rocket pad.
Keyframer Commands
On -> Make the Keyframer move along its path
Off -> Stop the Keyframer
Pause -> Pause the Keyframer at its current position
Resume -> Opposite of Pause
Forward -> Move forwards along the path
Backward|Reverse -> Move backwards along the path (this command apparently only works if the keyframer hasn't reached the last key. )
Toggledir -> Toggle between forwards and backwards
Goto <keyname> -> Go to a specific key
Moveto <keyname> <destination> -> Move to a specific key
Target<object>
ClearTarget
TargetOffset <x> <y> <z>
Trouble shooting:
Having problems? Check the properties of your :
1. KeyFramer
2. Each Key
3. Any other object that might be controlling your KeyFramer (i.e. switch, door)
4. Object that is being KeyFramed.
5. Naming conventions. Keep it simple and stay consistent. When naming your keys, they must have the same root name.
Start simple.
Get it working, then add more complex features.
Save often and save your maps under ascending names.
Bruce Campbell as Elvis says "Keep on Keyframin' baby!"
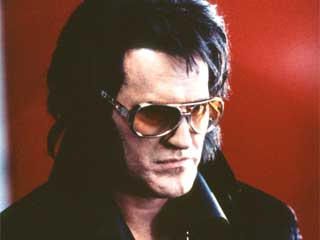
The possibilities of KeyFramers are endless!
(reposted from Nicepurcase.com/nolf)


